1. DVD recorders in the closet should be on already and should not be turned off. If the power happens to be off, press the power button to turn the machine on, but there is a time lag of 5-10 minutes before the machine is ready to record.
2. Press the [OPEN/CLOSE] button to open the DVD drive bay and insert the DVD-Ram disk. Do not use DVD-R, DVD-RW, or CD-RW disks.
3. Press the [OPEN/CLOSE] button again to close the drive.
4. Press the [CHANNEL UP / DOWN] button to set the recorder to your office channel.
5. Press the [RECORD] button to begin recording.
6. Flip the camera switch in your office to [ON] after the client gives their consent to be recorded.
7. When recording is finished, press the [STOP] button.
8. Press the [OPEN/ CLOSE] button to open the drive door and remove the disk from the drive. Press the [OPEN/ CLOSE] button again to close the drive.
PC DVD recording in more details
The same video used above was also used for writing using the PC recorders: the Pioneer DVR-A05, Sony DRX-500UL and HP 300i. The video was captured to the hard disk of our test PC directly from the DV camera through the IEEE1394 DV output. Once it was captured, it was stored onto the hard disk and used for burning all the discs. Subsequently, in order to speed-up the whole writing procedure, the initial AVI file was encoded once in MPG (Mpeg 2) and the same source was used through out the following steps.
The software we used for capturing, encoding and burning the MPG file was the ShowBiz by ArcSoft. The main reason we chose this software is that it is very easy to use and allows controlling of the essential settings only. In addition, the same software could be used for all capturing/encoding to DVD (burning). This would protect the validness of the tests from possible incompatibilities in case we used different applications for each task.
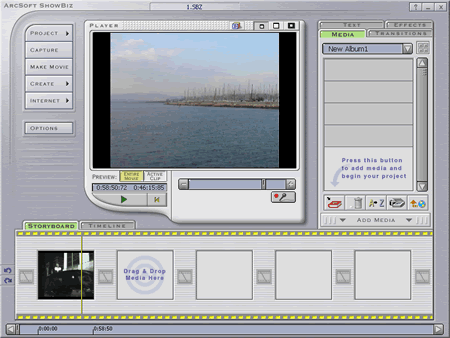
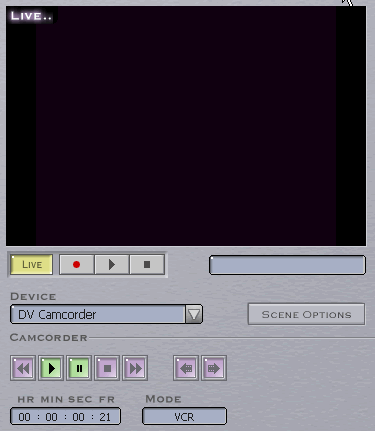
In order to capture the source video to the hard disk we launched the ShowBiz and simply started capturing, as you can see in the picture below:
The next step is to create the DVD file and burn it to the DVD recordable/rewritable media. The ShowBiz includes these tasks in one step, by selecting the "make DVD" option. Below are the settings for the DVD file to be produced:
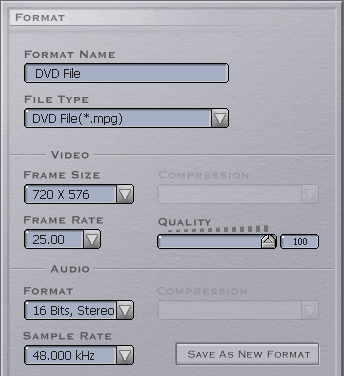
As you can see the frame size was kept at 720 x 576 for the PAL format, and the quality bar was set to the maximum value. The audio settings were 16 Bits, Stereo, and the sampling rate was 48Khz. The specific settings match to the type of output the DV camera offers.
According to the writer we used, each time we made the following settings. The writing speed is automatically decided by the software. In our tests, all drives recorded in the maximum allowed speed by the inserted media. (4x DVD-R, DVD+R, 2.4x DVD+RW and 2x DVD-RW). Nevertheless, we also used our clocks for checking the actual recording time in case the drive itself had decided to drop recording speed for whatever reason.

The procedure was repeated for all the recorders/media combinations. In most cases, we burned more than one disc of each type with the same writer (backup disc). This was done since we had to switch the testing disc after every 5 players we had tested it, to make sure the disc we test is in perfect physical condition.
The produced discs were carefully stored in their cases and handled with care during testing.